


How 3D Location is Made for HOG Games
April 24, 2024
Hello everybody! The most common way to make a beautiful location for a HOG game as Time Gap is creating a 3D model based on a 2D concept. The process is really complicated and involves several steps. Here's a general guide to get you started:
Conceptualize the Scene: Begin by thoroughly understanding the 2D concept. Identify key elements, such as the layout of the scene, objects, lighting, and any other important details.
Choose 3D Modeling Software: Select a 3D modeling software that you are comfortable with or the customer requires. The most popular options are Blender and 3ds Max.
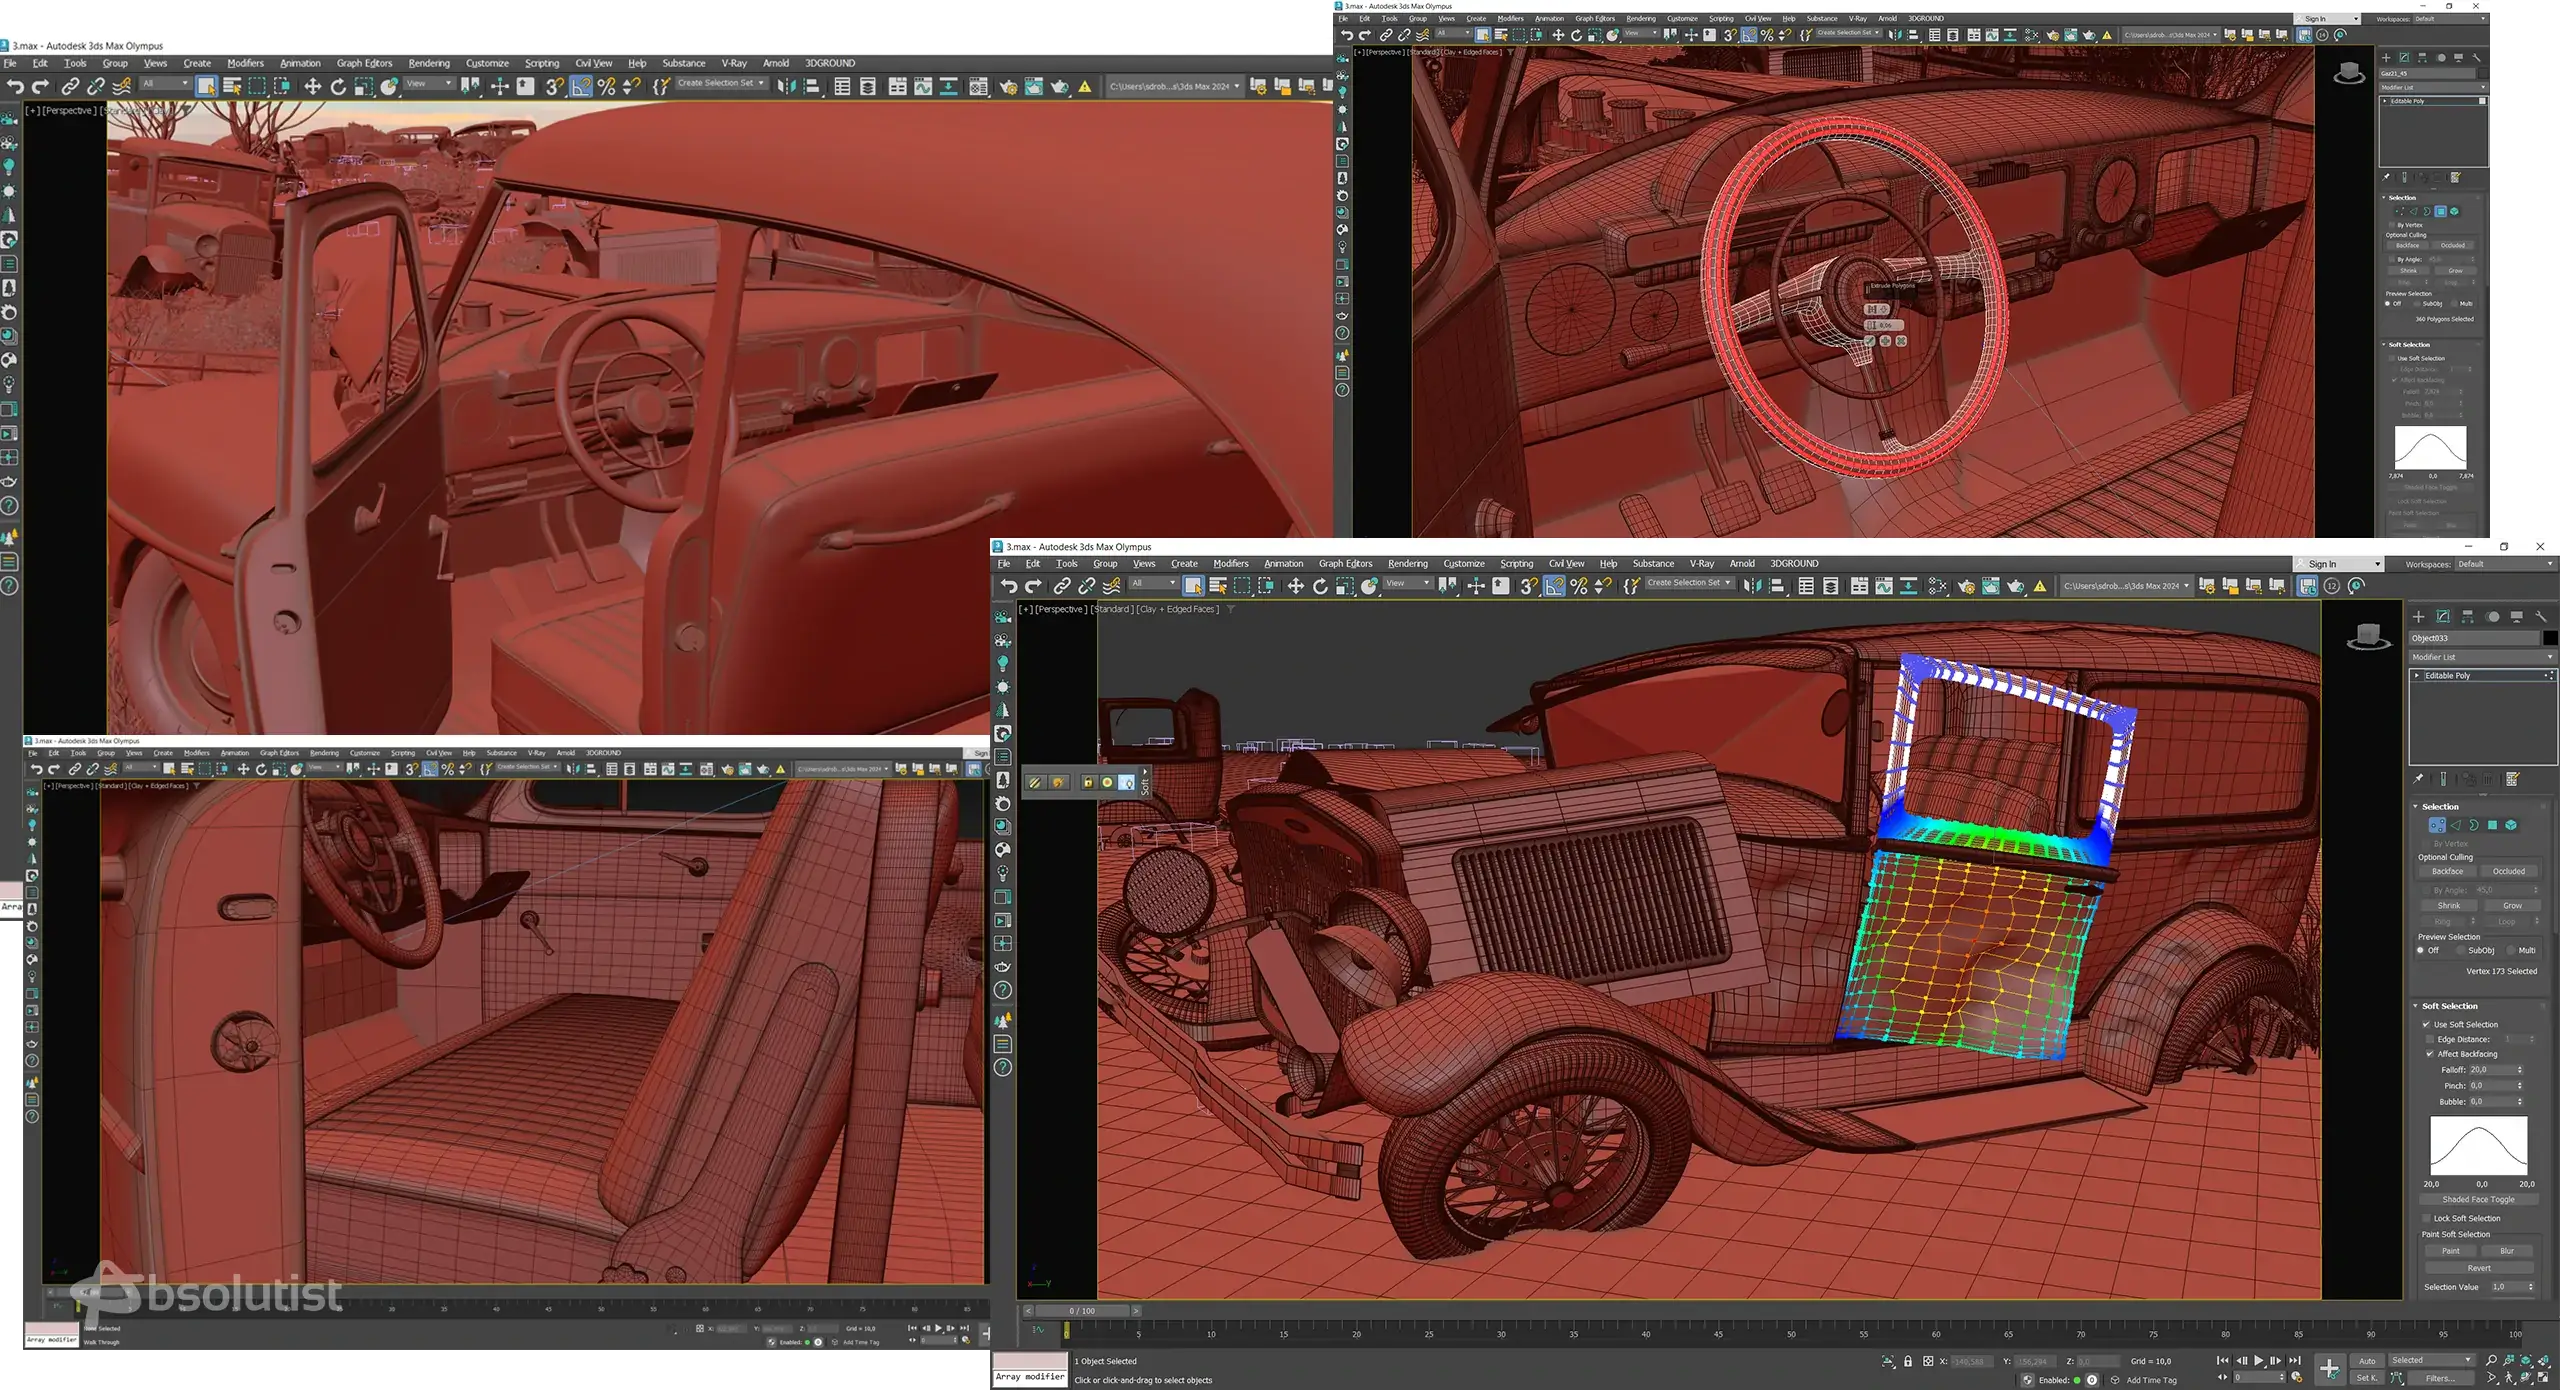
Create a Rough Sketch: Sketch out a rough 3D layout based on the 2D concept. This serves as a guide for creating the detailed 3D model. The angle and location of the camera, the inclination of the vertical, the full angle should correspond exactly to the angle of the sketch. The reciprocal arrangement of the objects should also accurately repeat the placement of objects on the sketch, all objects should be in the same places with the same declinations from each other. All items must be properly cut by the IU frame, just as it is in the concept.
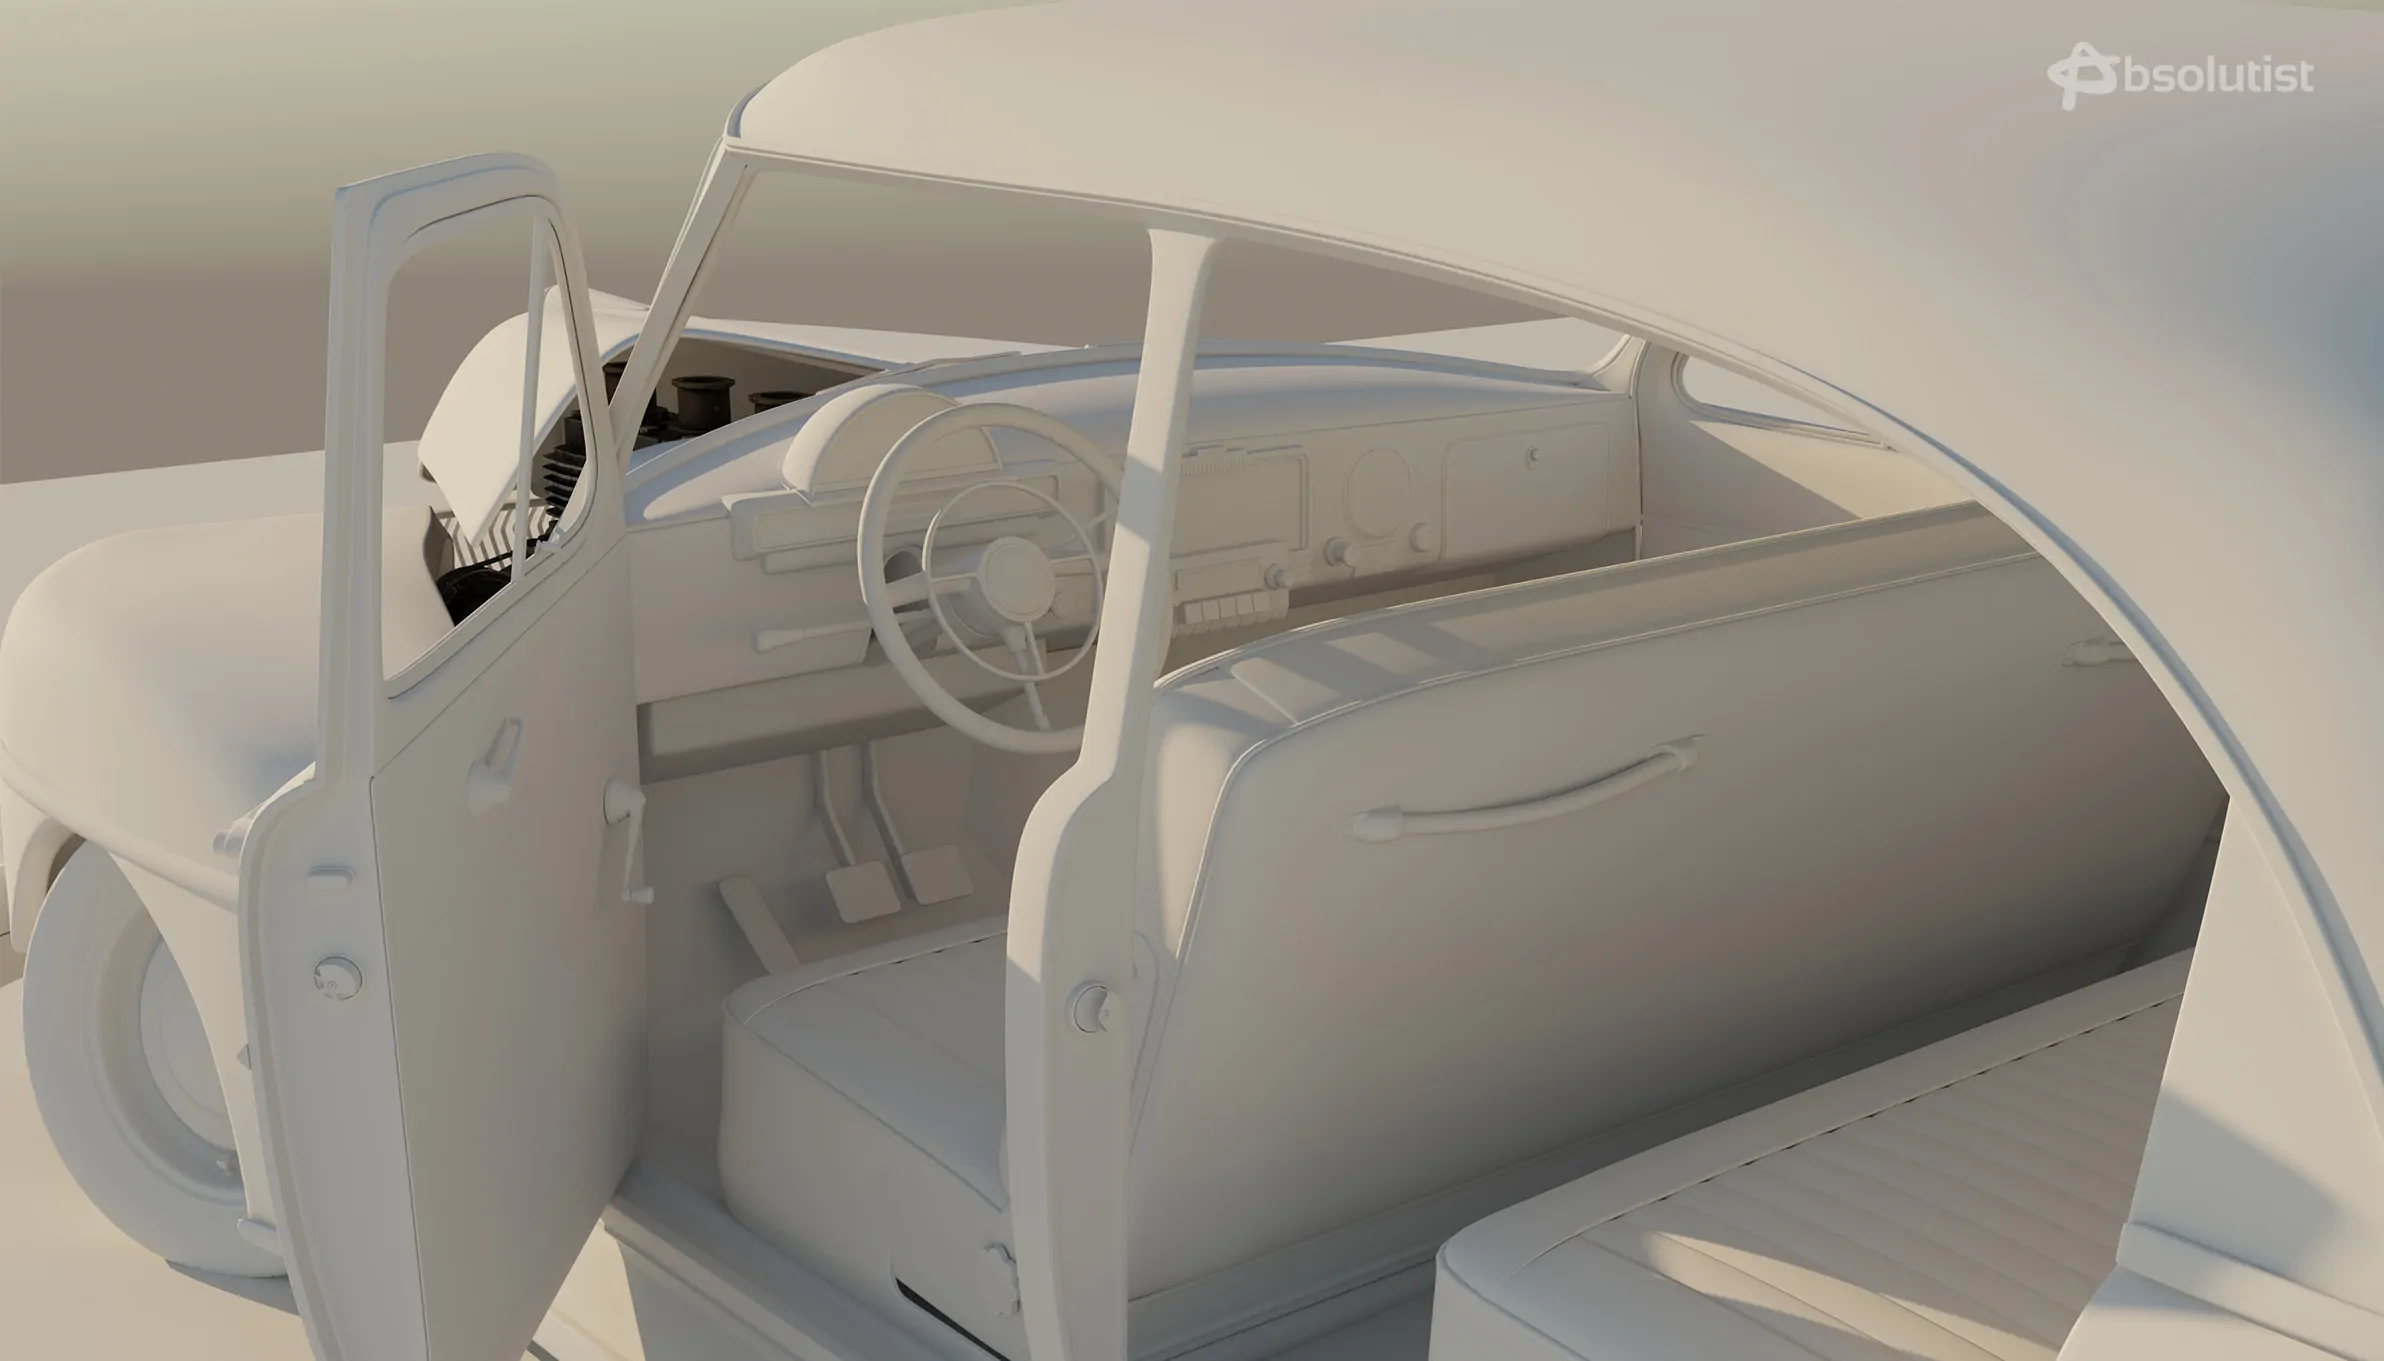
Modeling: Start modeling the scene in 3D based on your sketch, plot description and refboard. Begin with basic shapes and gradually add detail. Pay close attention to proportions and scale to ensure realism. For example, if the object has tobe rectangular, it is not allowed to make the angles of the object stretched in order to get into the sketch. All proportions of objects have to correspond to human anatomical parameters. The size of objects should be correctly correlated to each other, and to the scale of a human. The lifehack is to place a 3D human model into the location in different places and poses, i.e. to check if they could sit on the chair, lay on the bed or drive the car. It also will be very useful in the next stage while making the HO placement.
Detailing and design: All models used in the scene are all of high quality, have the correct geometric grid, have no locks or artifacts associated with the lack of polygons. The edges of furniture items should not be chopped, you need to make roundings and bevels to achieve realism. Decorative elements such as cornices, moldings should also be in service.
The design of the elements has to correspond to the sketch and real photo references. Minor changes are allowed, but the design of the item should not be too simplified, too complicated and should not change its essence and purpose. All models used have to correspond to the time period of the game, the required architectural style and territorial localization. For example, the eastern and European countries have their distinguishable architecture and design elements, as well as the Middle Ages and our days have completely different architectural styles.
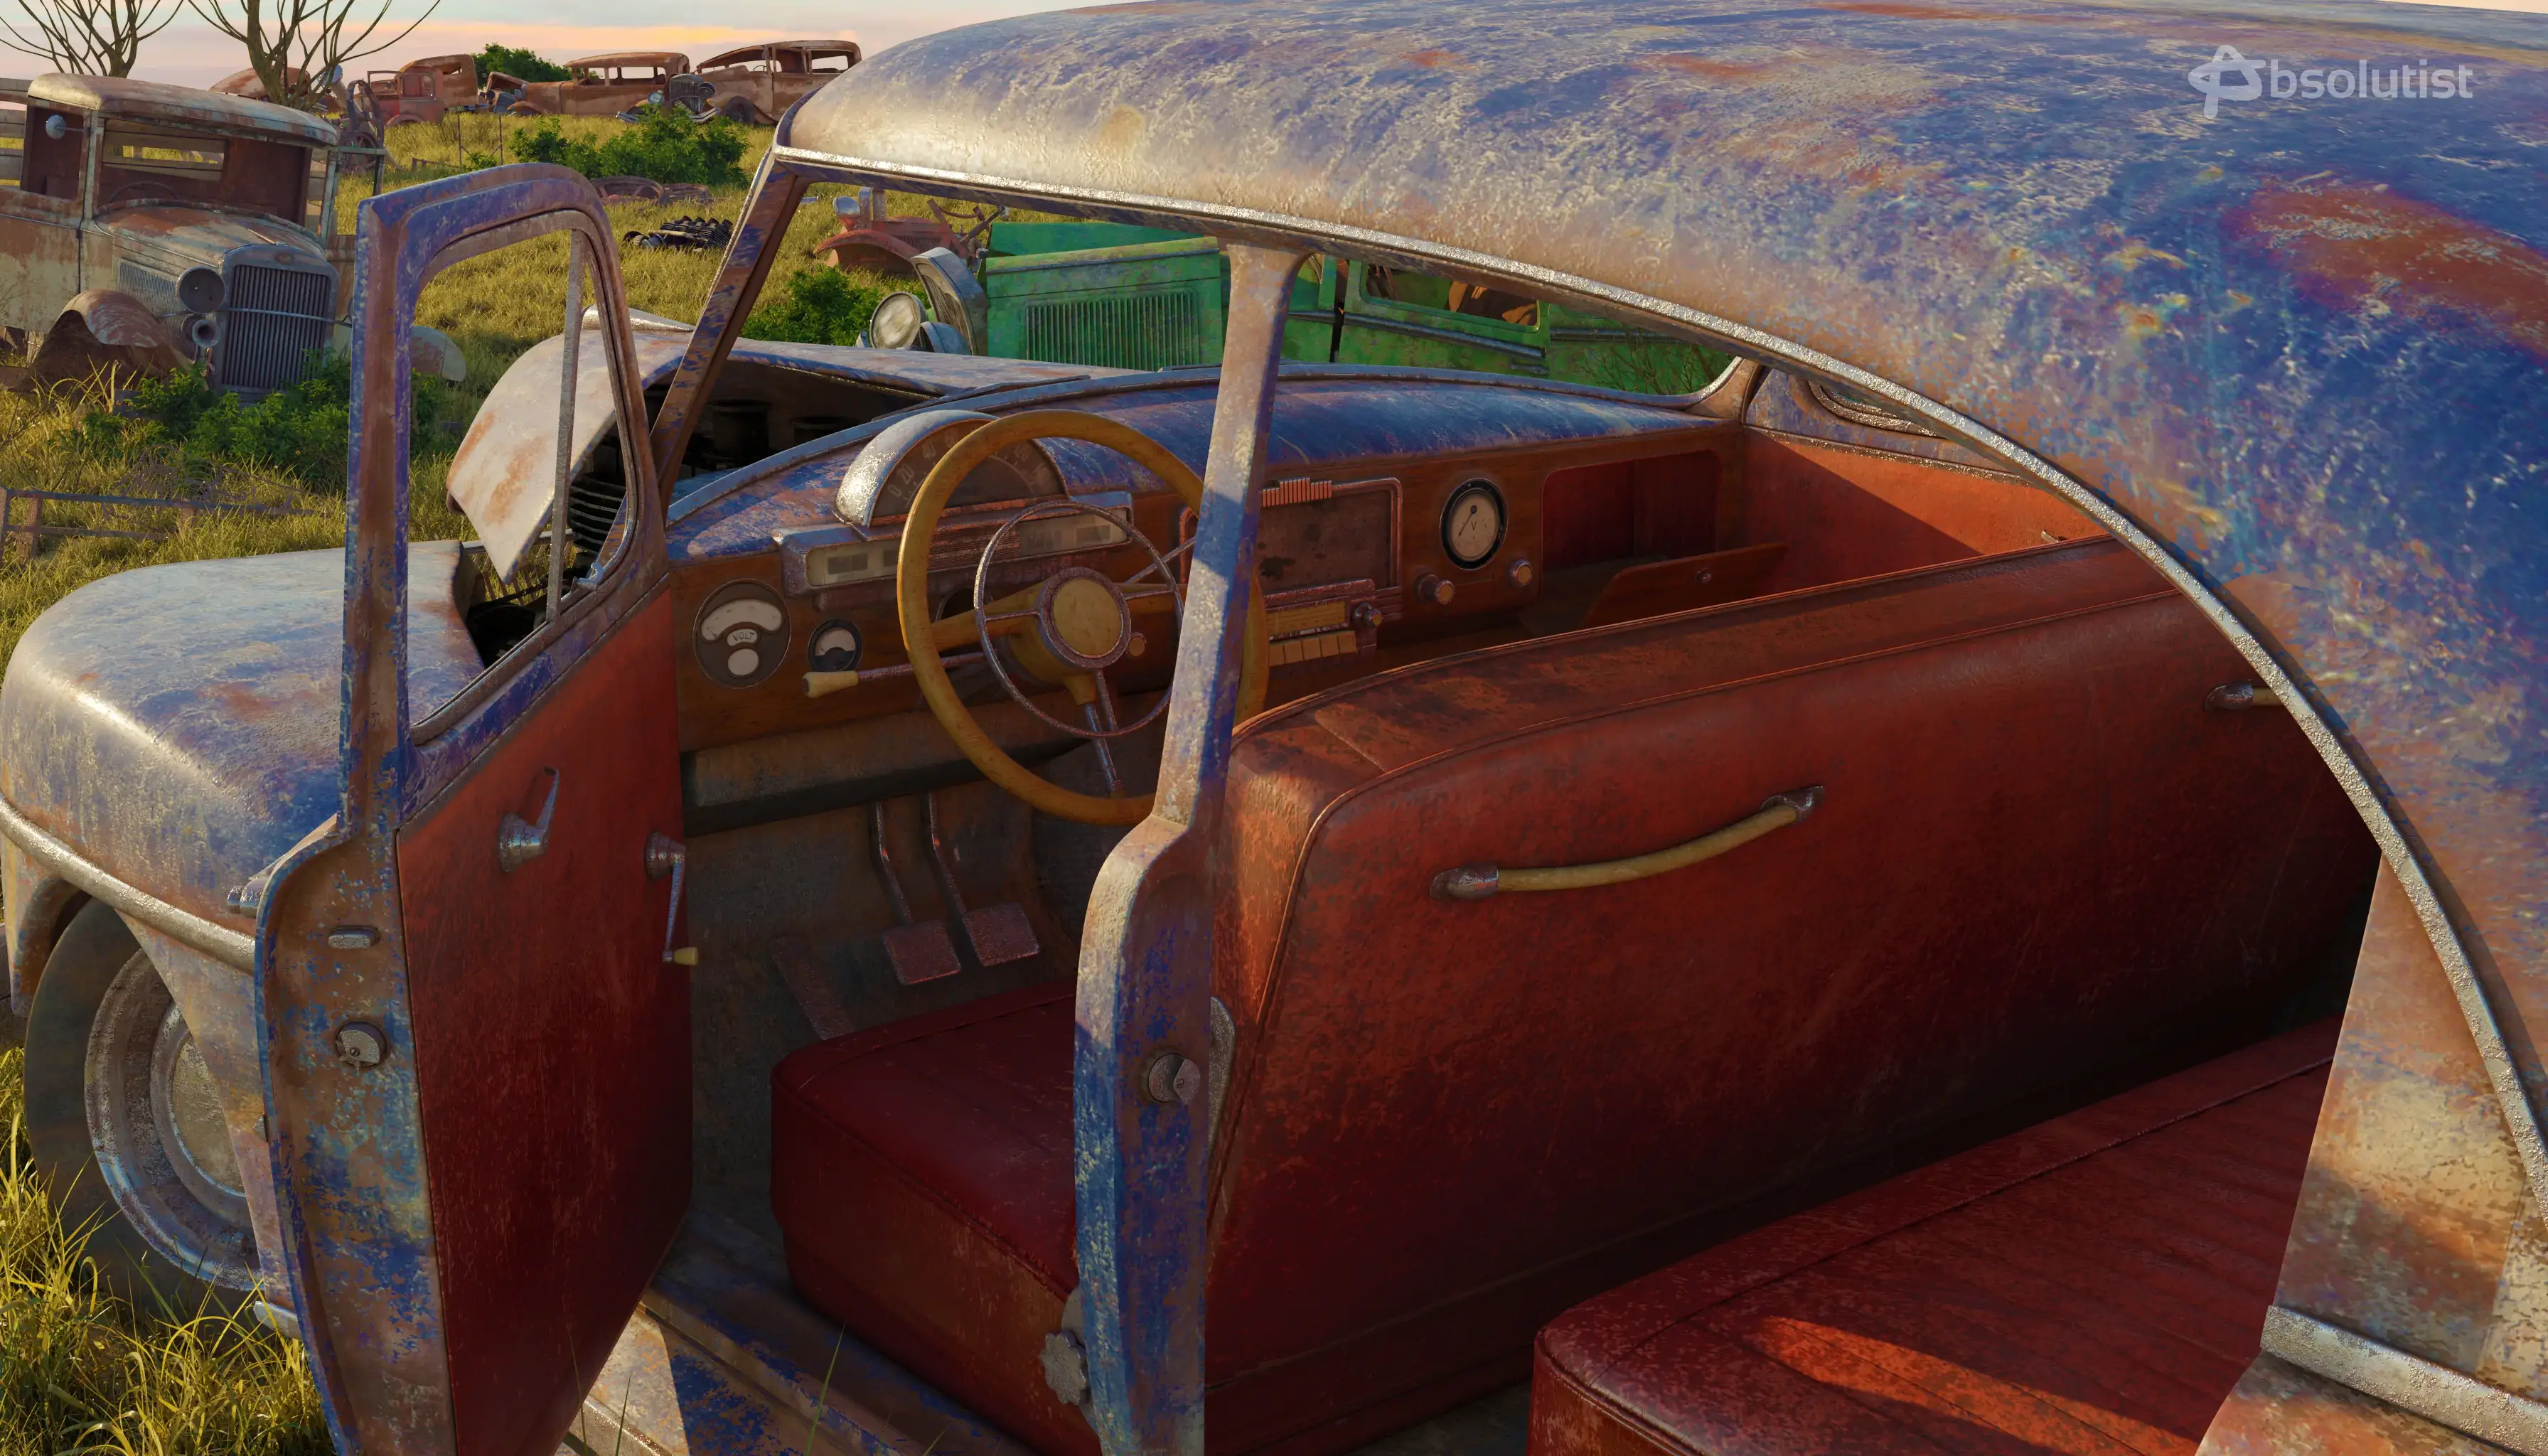
Materials: Creating materials in 3ds Max involves assigning textures, adjusting parameters, and fine-tuning settings to achieve the desired look. It’s a complex process, especially for more advanced materials as you need to have a good understanding of the physical properties of materials in nature. This might include color, reflectivity, transparency, bump mapping, etc.
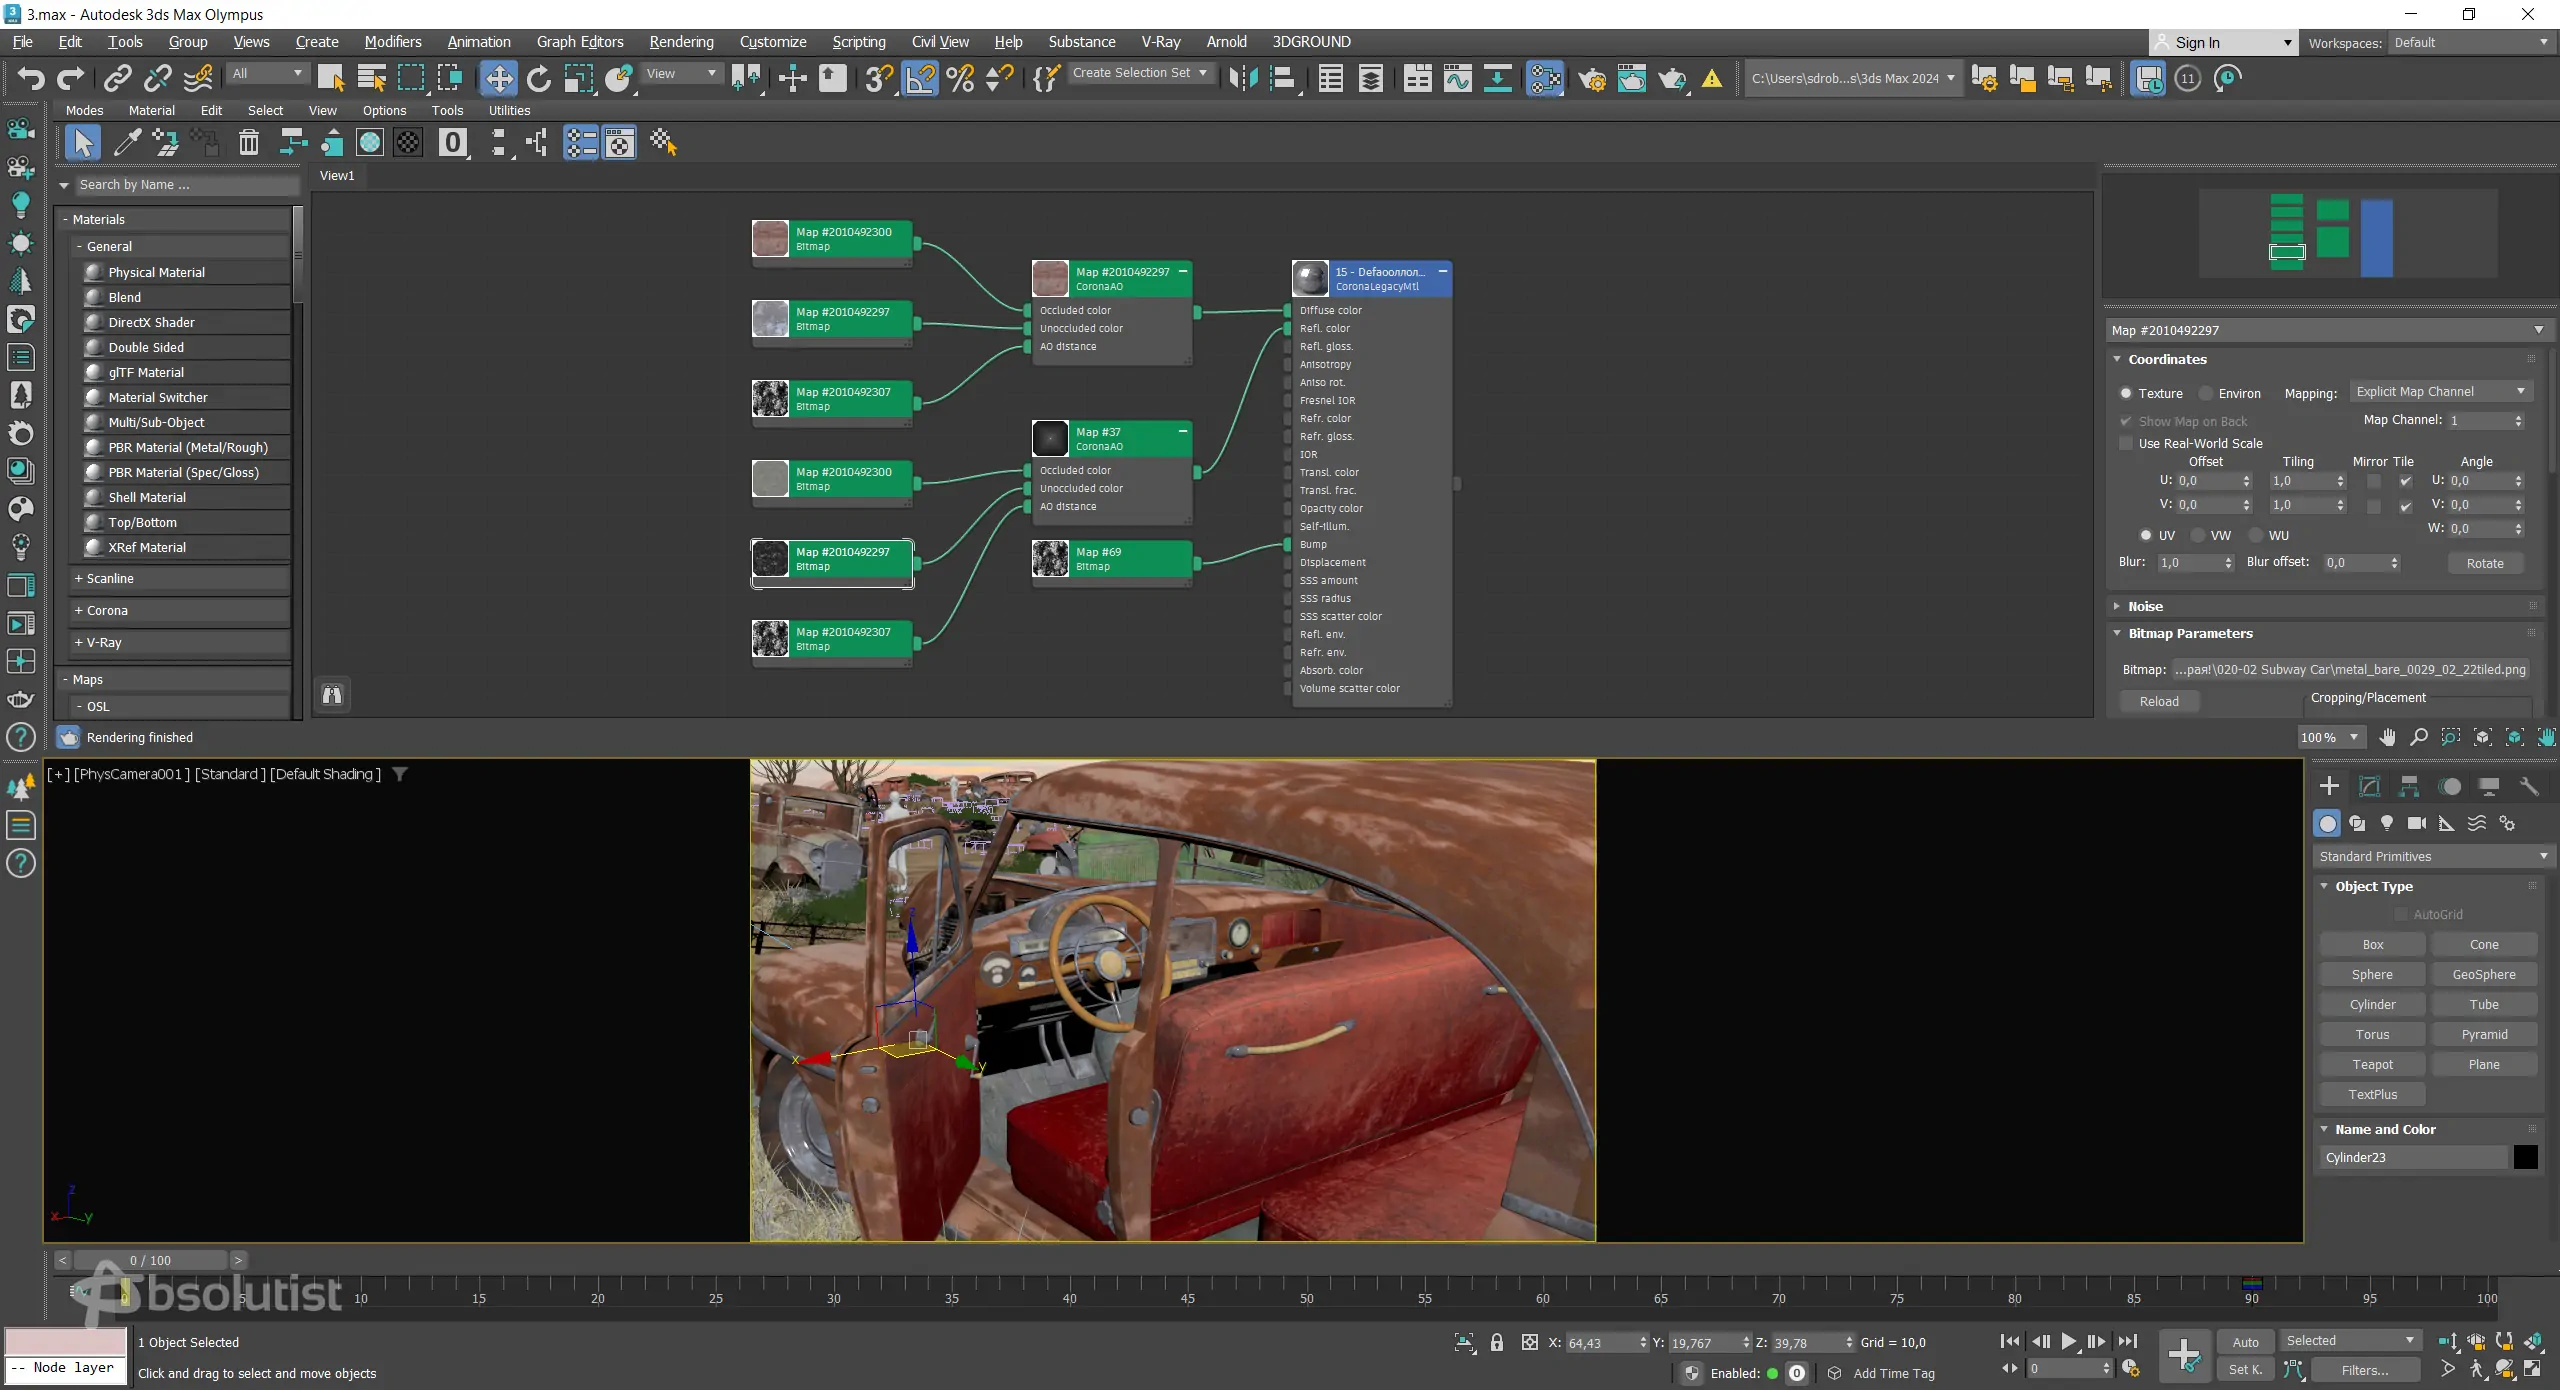
Material settings "Old Rusty Chromed Metal"
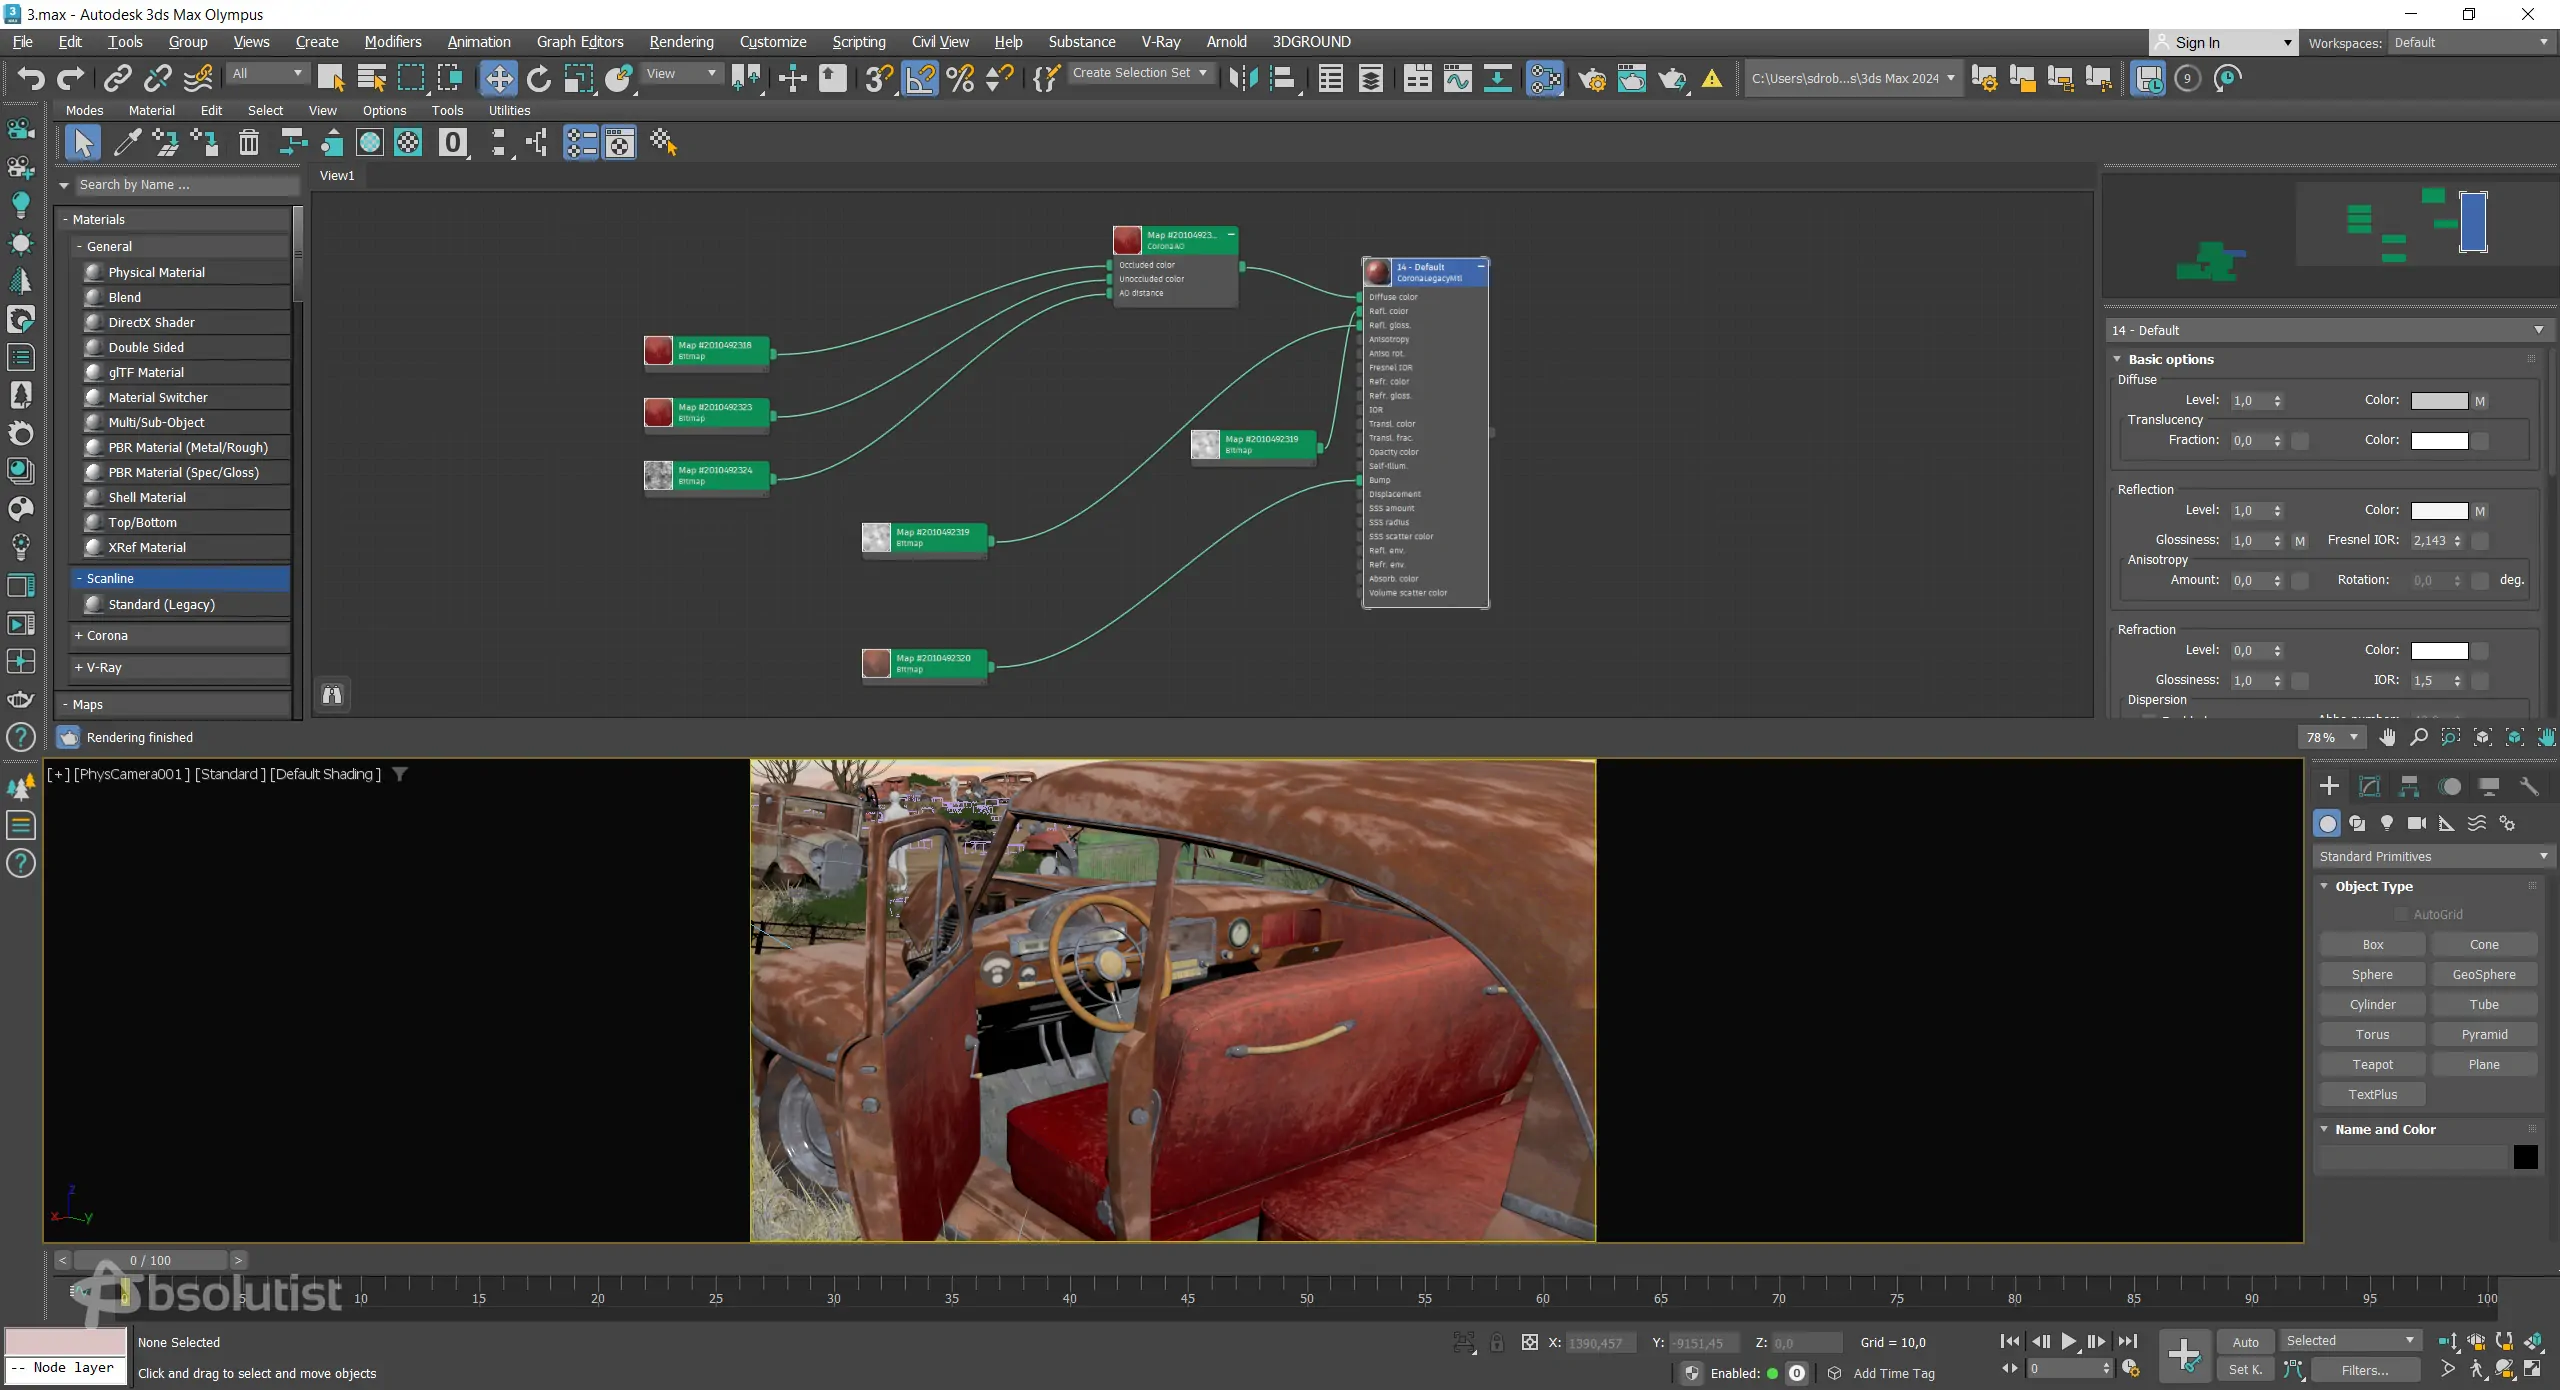
Material settings “Dirty Leather”
Texturing: Apply textures to the 3D model to give it realistic surface properties. This includes textures for objects, walls, floors, and any other surfaces in the scene. You can either create your own textures or use pre-made textures from libraries or online resources. The textures must be of high quality. For some objects such as a door, you can also use textures. For walls and other similar planes, it is recommended to use photo textures of real objects that have various types of environmental influences. To avoid strong overexposure, the glossiness and reflections of materials should be reduced.
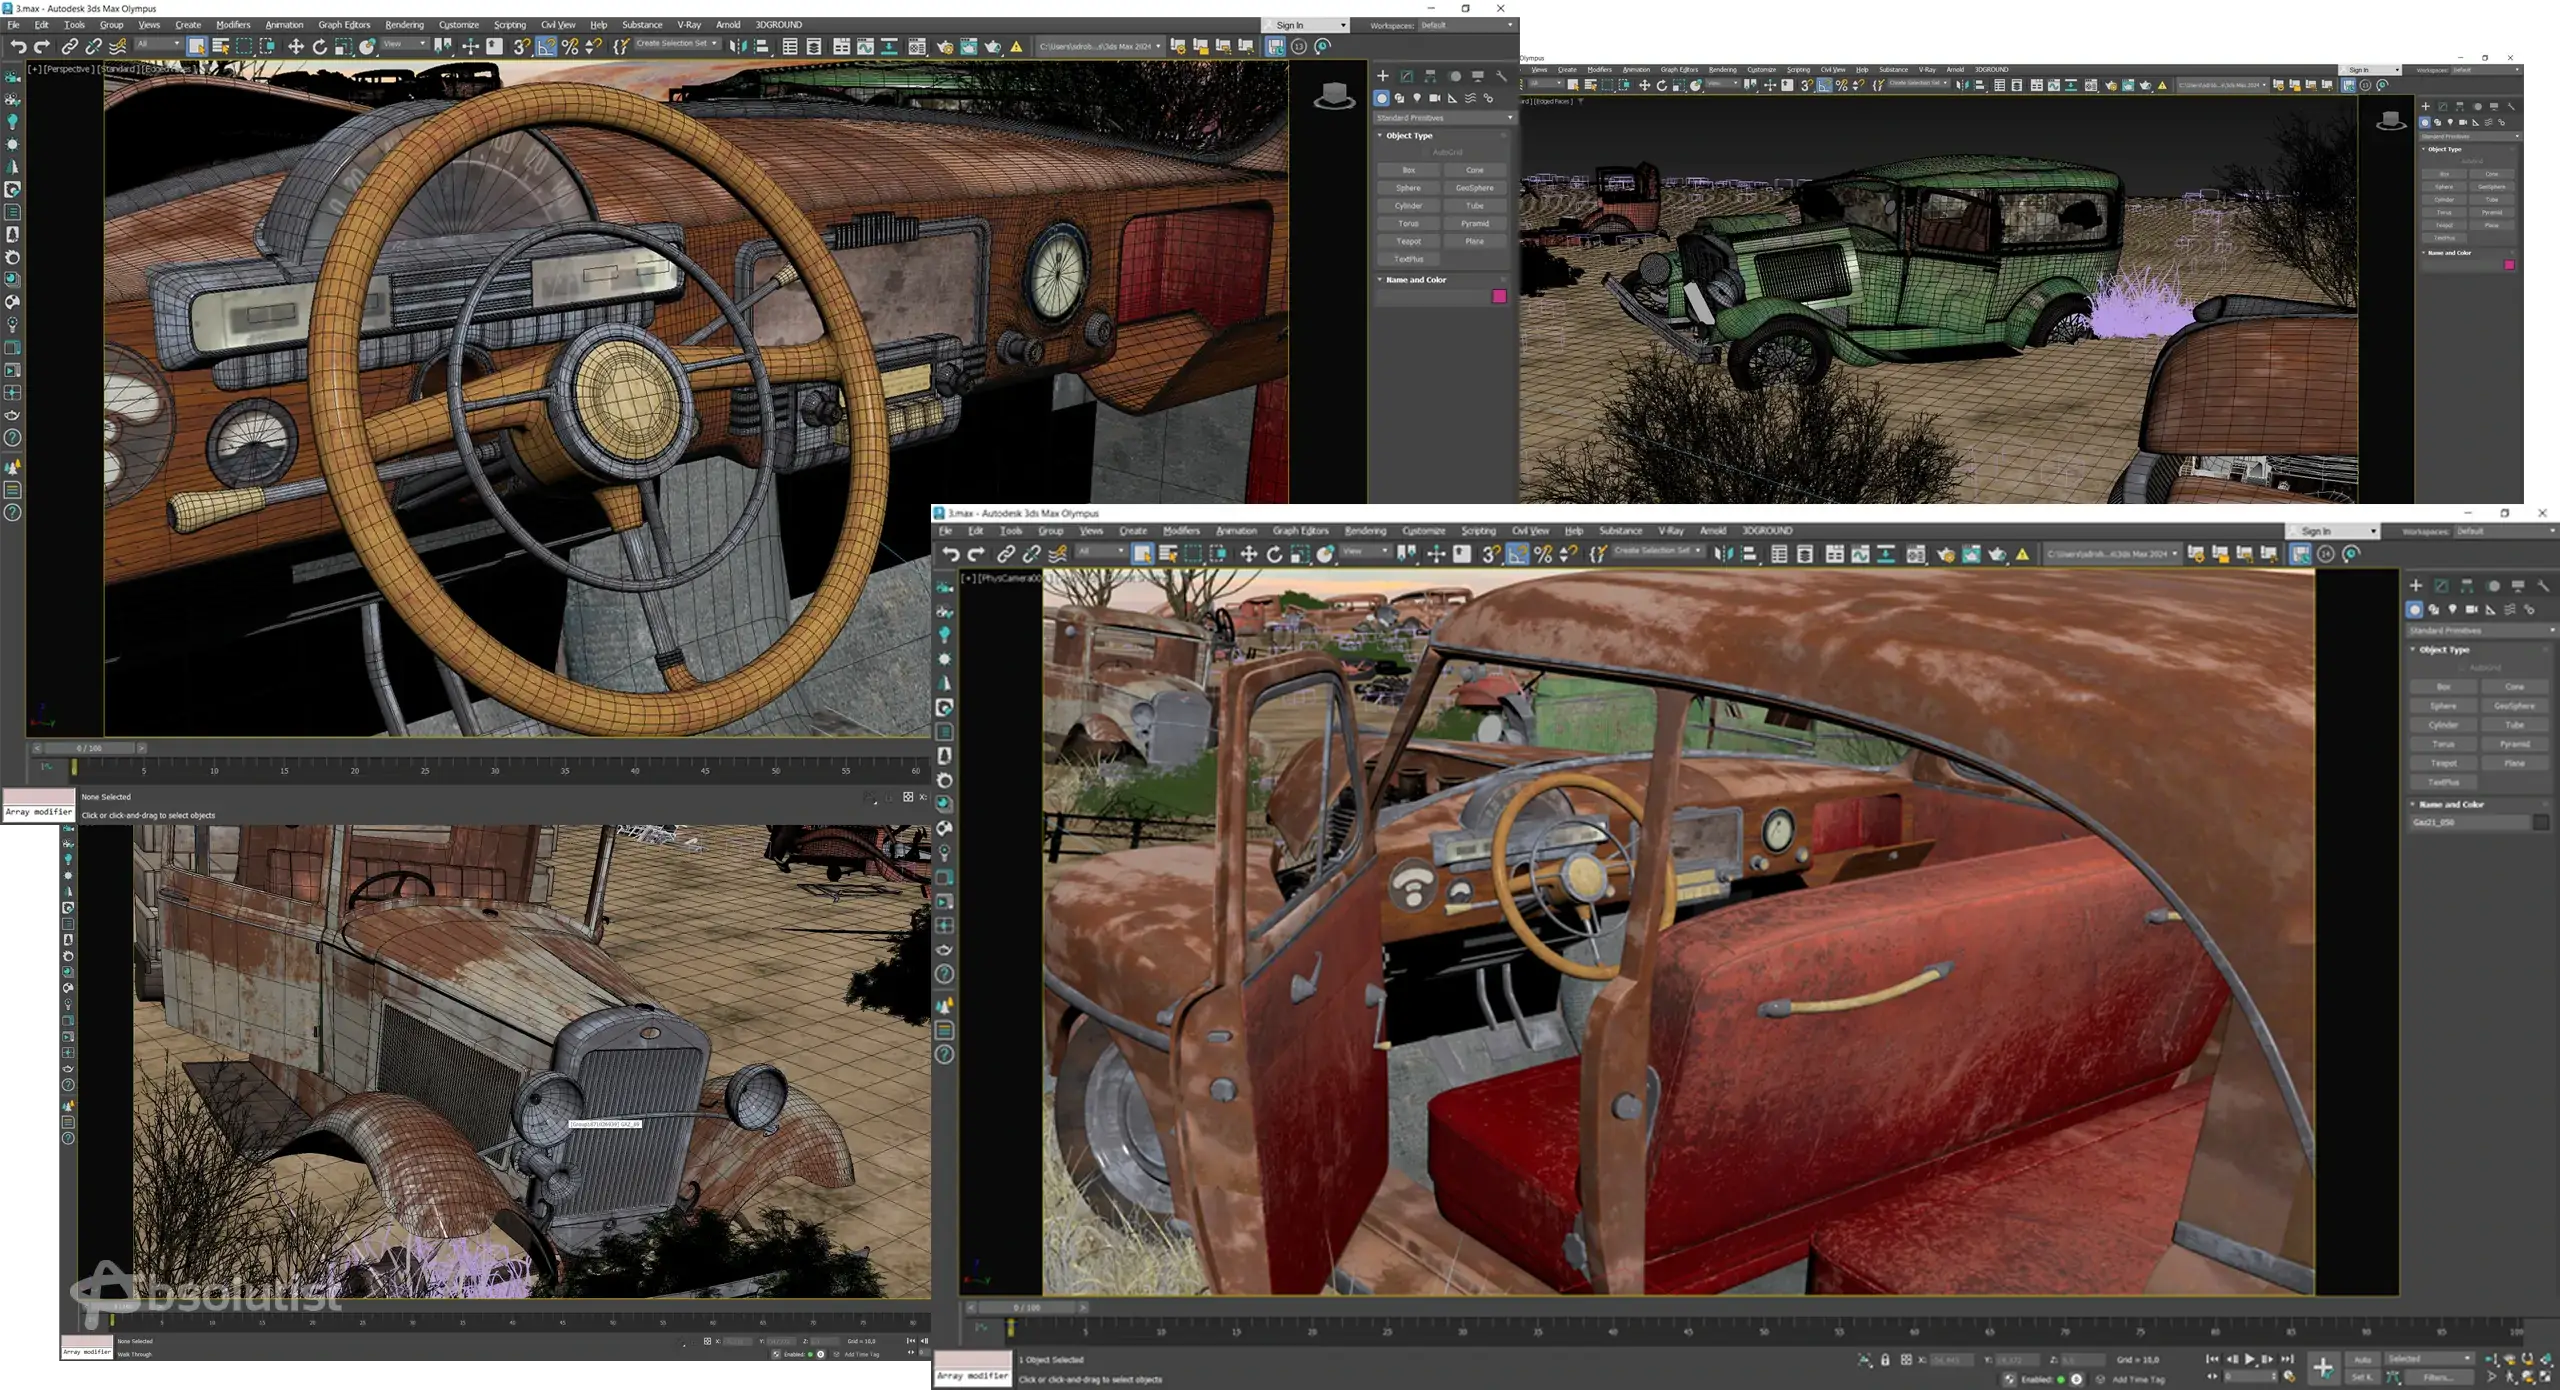
Lighting: Set up lighting in the scene to match the desired mood and atmosphere. Consider factors such as the time of day, light sources, and shadows. Experiment with different lighting setups until you achieve the effect created in concept. Light sources should be in the same places as in the sketch. All light sources ought to have the same intensity and warm-coldness that the sketch assumes. The direction, shape and length of the falling shadows should also be taken into account and correspond to the sketch.
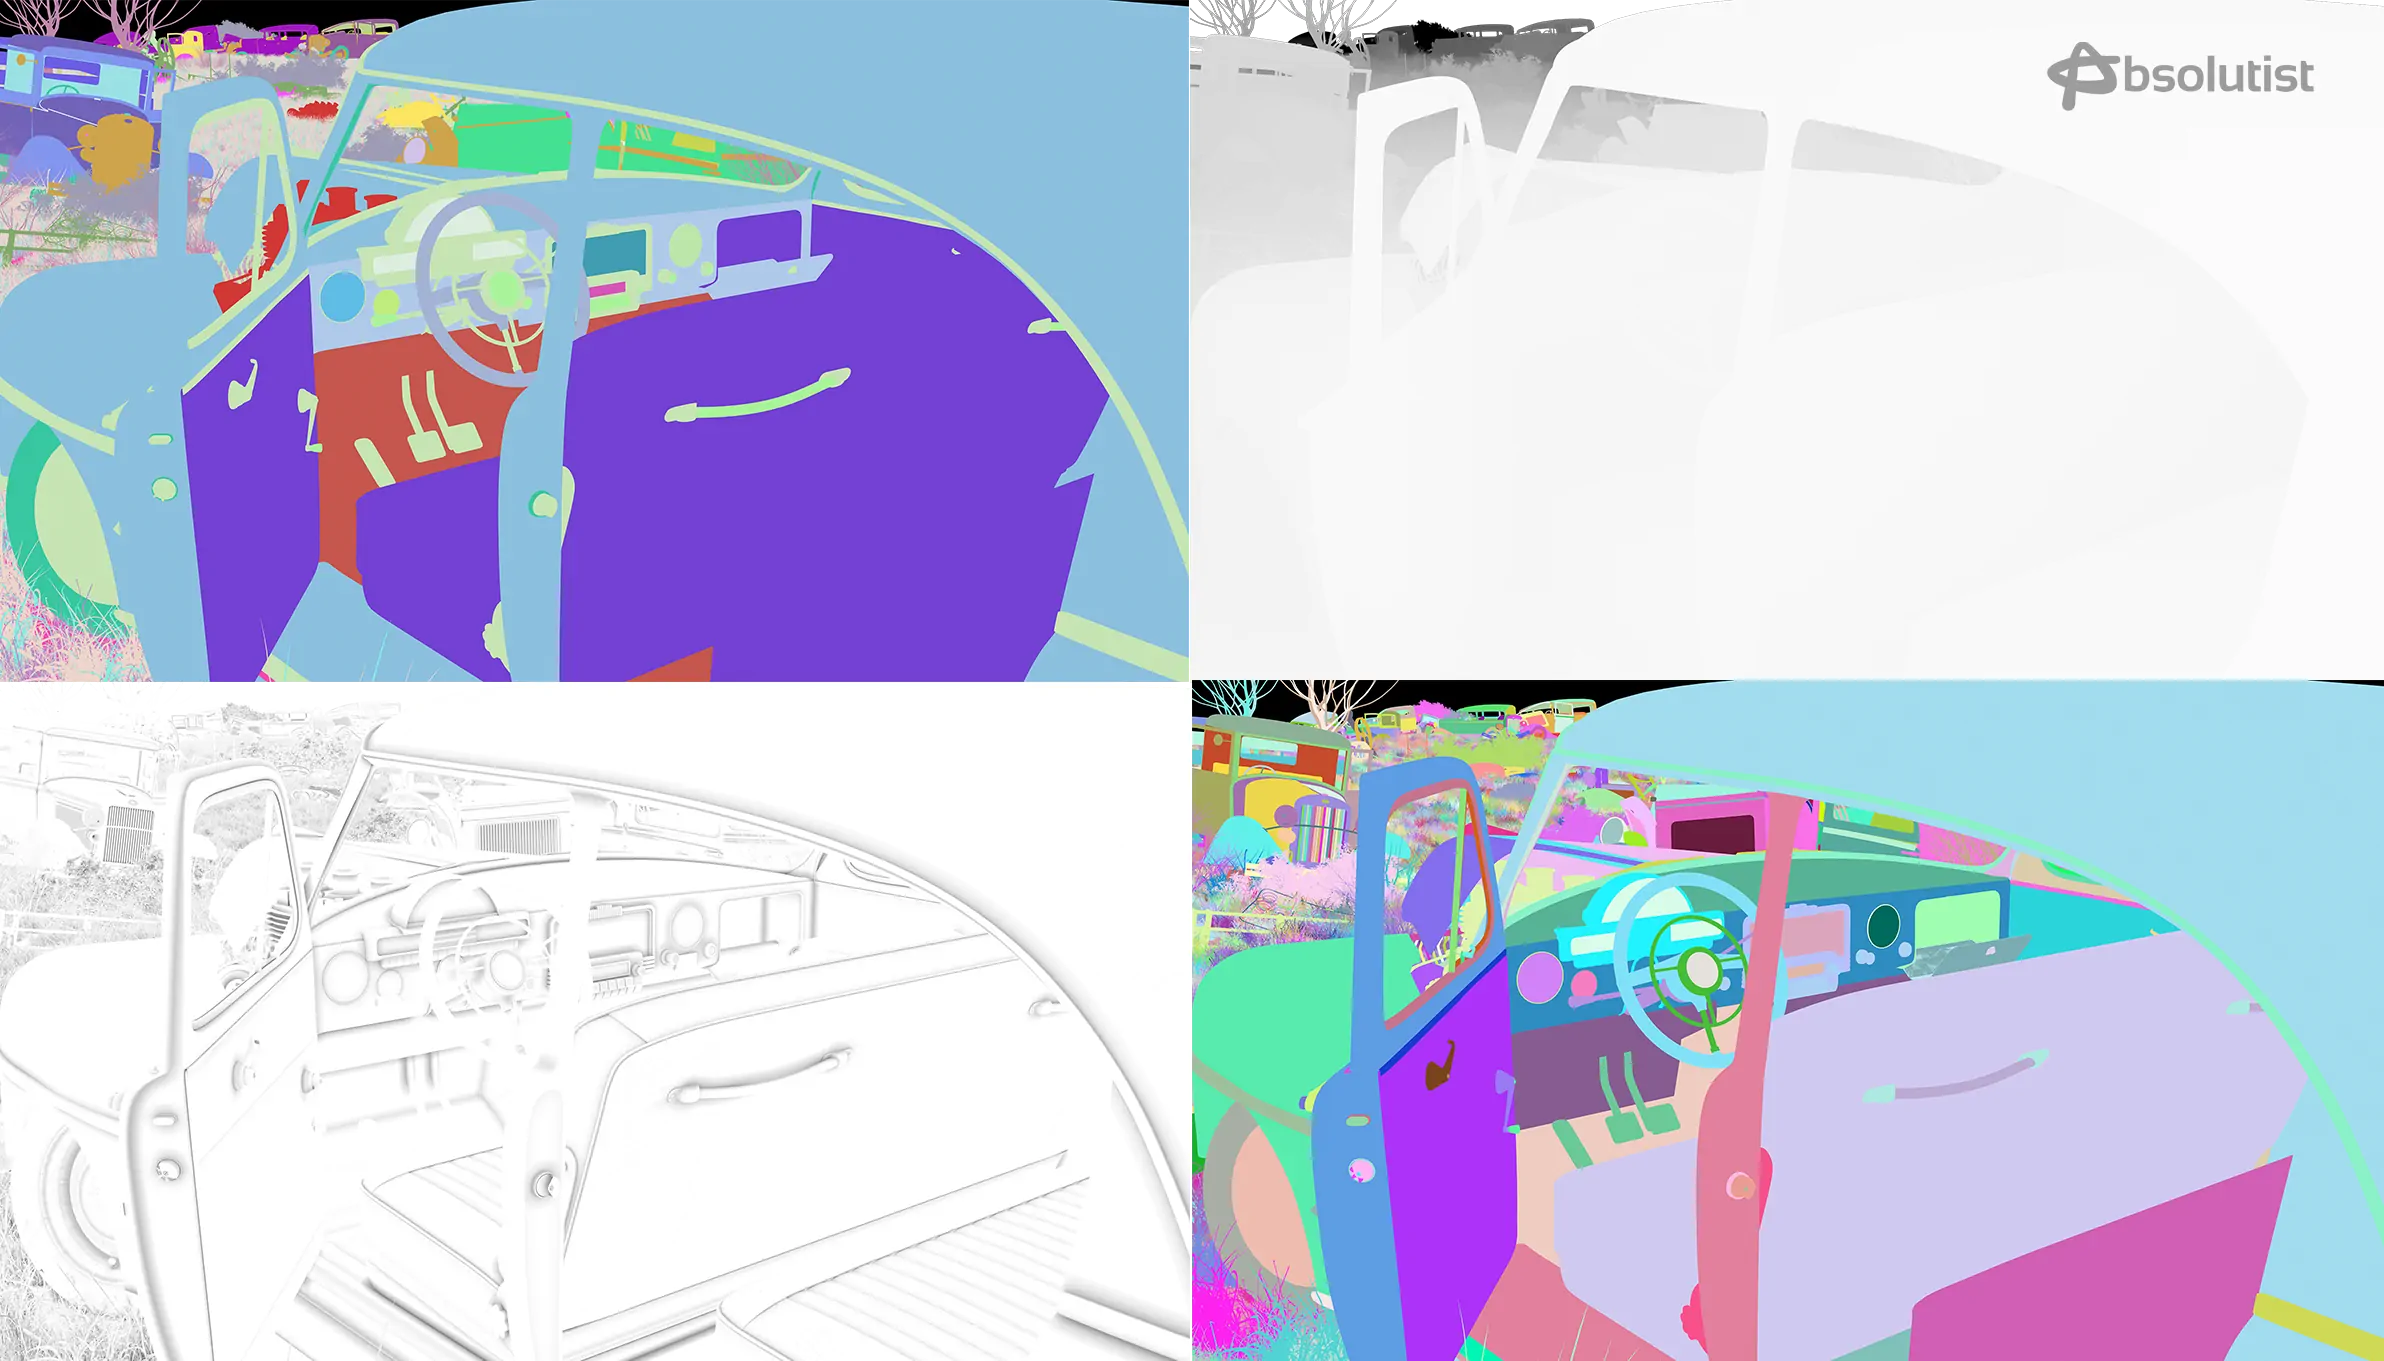
Rendering: Render the final 3D model to generate high-quality images. Apart from rendering itself you need to make the Occlusion Ambient Mask and Depth Mask, which are very useful in the presentation stage. The Depth Mask helps to show the difference between foreground and background in the most correct way, both at the 3D stage and later in 2D postproduction. The Occlusion Ambient Mask is used to make all the details in the scene, and especially the various bevels and chamfers, look more voluminous.
Presentation: Present the final render in the image, combining the render, OA and Depth masks, and adding the sky layer from the concept art or the photo references. Sometimes it is acceptable to make some slight correction of color tones in 2D programmes. Share it with others for feedback.
Export and Share: After the needed iterations when the result satisfies everybody, export the 3D model in the png files, such as render image, AO Mask, Depth Mask, CMasking ID and any other masks on demand. CMasking ID involves: mask on materials and mask on objects (for example, if there is a plaster stucco on the wall, then in this mask the planes will be split by objects, not by material, enabling you to choose the necessary decor separately).
Remember to have fun and be creative throughout the process! Experimenting and iteration are key to creating an engaging and memorable hidden object location in 3D.